It’s hard to believe that we’ve already had our Jay Feather Micro 171BH for two years now. We made a video after the first year and went over the good and the bad and any issues that we had in that first year. Now that we’ve had our trailer for two years, we thought we’d do it again and let you know of any issues that came up in our second year of owning the Jay Feather Micro.
Rogina Roaming is supported by its audience. When you purchase through links on our site, we may earn an affiliate commission at no extra cost to you.
How Often We Use the Trailer
So first I just want to give you an idea of how often we use the trailer. We are not full-time, we’re weekend warriors, so we go camping basically when the kids don’t have to go to school. We try to go at least once a month. We go on weekends, we go on breaks from school and summer vacation, that kind of stuff.
So in this last year, not the total time we’ve had this trailer, but just in this last year, we went to 19 different campgrounds and we towed the trailer a total of 3,250 miles.
And maybe this is a spoiler, but I’m just going to say right away, we still love this trailer.
How We Feel After Two Years
If you read the first article, you’d notice that most of those issues, the word issue is too strong to even say about most of those items. Most of them were just kind of complaints and little nitpicky things here and there.
And then in the second year it’s pretty similar. We did have a couple of issues which we will go over, but I just wanted to let you know we still love this trailer and none of these issues are so big that we’re upset about it.
We understand that there’s a DIY element that comes with owning a trailer, so we just wanted to put this content out there so you have a better idea of what some of the possible issues are that you can expect when you own a trailer.
Year 1 Follow-up
So first we’ll go over some of the issues and complaints that we mentioned after the first year. Some of them we have addressed so we wanted to follow up and let you know how we’ve addressed those.
And if you haven’t already read or watched our one year review, I would still recommend watching it. It’s still relevant and I think it goes well with this video.
Windows
So the first was we complained about the amount of windows specifically on the camp side. And what we have done since last year is we have replaced the window in our front entry door.
So instead of a frosted glass window, now there’s a window that you can actually see through. And it has a thin shade which can be closed and blacks out the window.
I was hesitant to do this change because I thought it would be annoying to have to open up the door to be able to put the shade up and down because it’s in between the door and the screen. I was worried that would be irritating.
It turns out it is so worth it.
Opening and closing the door to change the shade is really not a big deal. I mean, you really are only changing the shade in the morning and the evenings. It’s not like it’s happening all of the time and it is so worth it just to have that extra visibility. It makes a way bigger difference than I had expected and I am really, really happy with it.
Installing it was pretty easy. It came with plastic tabs. There were 16 little plastic tabs and they fit right on the existing window. There’s little slots around the edge of the window and you put all of these tabs in there and that allows you to separate the front of the window with the glass from the back of the window with the plastic that’s holding it into place.
Now we did need two people to do this just because we wanted to have somebody on the outside holding the glass up while the other person inside of the door was working on putting those little plastic pegs in and pushing the window out. We didn’t want to take any chances of it falling and shattering.
And then when we put it back in it was a similar process. We had somebody hold one side of the window while somebody was tightening on the other side and pushing it into place.
So it’s a little awkward, but it was easy to do. It took us about 20 minutes from start to finish.
And something really cool is I noticed when I was looking at the 2023 model of this same trailer that those are now coming with the entry window that’s clear and you could see out of. So it’s cool that they’re switching out that frosted window and now it’s coming with this nice entry window right from the get-go.
If you, like us, have a frosted window that you’d like to replace here’s the window we used:
Drawers
Another complaint that we had in our one year review video was about the drawers. We’ve had a lot of issues with the drawers and consequently they were really difficult to open and close. So we started looking into it and we found that there were a couple of issues with them.
Basically, the way that the drawers are mounted is not very secure. The big issue that we had was related to the slides. The front of the slides were mounted pretty securely onto the cabinets, but the back of the slide rails were stapled onto a wooden assembly that was basically hanging in the back. There was one little screw and then the slides were stapled on.
What happened is the backs of the slides started sagging. There wasn’t enough holding them up. And so instead of the slides being straight and even they were at an angle. And so that was the biggest issue that we were having.
To fix this, we put some wood onto the side of the rails so that they can be secured between the cabinet and the drawer. Instead of only hanging in the back, they’re secured on the side now as well. That seemed to help our drawers quite a bit because that was the biggest issue that we were having.
Another problem that people are having with their drawers is the bottom of the drawer is sagging. There’s a gap in between the side of the drawer and the bottom. The drawer is bowing and sagging so it’s not supporting the items that are in the drawer.
Now, luckily we haven’t had this issue yet, so we have not fixed this. But, what people are doing to fix this problem is they’re adding a couple of simple items.
The items they are adding are:
The first item are little corner wedges. They are little plastic corners that go on the bottom of the drawer to help cinch up the bottom to the sides.
And the other item is a rail support on the bottom of the drawer across the center. So underneath on the bottom of the drawer, they’re adding a little rail to help add some additional support to the base.
So, we haven’t experienced that issue with our drawers yet. Our issues were related to the slides, and so we’ve addressed that by adding more wood on the edges to better secure the slides so they’re not tilting backwards. It took a little bit of work, but that’s no longer an issue for our trailer.
Dinette Curtain
Another thing we mentioned in our one year review was the difficulty to shut the curtains next to the dinette. The bottom of the curtains are so wide that they hit the table and you have to twist the end of the curtains and scoot the table out of the way to get the curtains to pass it.
Now there’s been a couple of good fixes that people have done for this, and so I thought I’d share them with you even though we haven’t actually addressed this yet. We got used to it and so we haven’t dealt with it yet.
One possible fix for this is you could take the table and then take the legs that are mounted on it and adjust where it’s mounted over by about a half an inch and then that will give enough clearance to shut the window blind without it hitting the table.
The other thing people have done to fix this is by changing out the blinds completely. That way it can use something a little bit thinner, like a roller blind, and then it’s not going to hit the table because it’s really just the base of the blinds that hits it.
Bunk Ladder
And the last item that I want to mention from our one year review is about the bunks and accessing that top bunk.
So this is the item that I got the most comments about. I received a ton of awesome ideas and suggestions for what we can do to make it easier to get on that top bunk.
However, since our one year review, our son doesn’t have any issues with accessing the top bunk. Now he’s eight and he’s been getting in and out of the bunk for so long that it’s not a big deal for him anymore. So it’s no longer an issue for us.
So I haven’t done anything to address it. But I thought that there was some cool ideas and I did want to share those just in case somebody else was looking for a solution.
So first is in the 2023 model, they actually added a bunk ladder. It’s really cool. It just folds flat against the wall between the bunks and the bathroom and you can fold it out and then it’s supported on the floor. So it looks like it’s pretty secure. I haven’t tested it myself, but it looks like it’s a really cool solution.
It wouldn’t work for our trailer because that wall is where the original solar controller is and it’s where we’ve put our Cerbo GX. So it’s how we monitor our current solar setup. So we wouldn’t want to put anything on that wall because it would interfere with the screen, but in the 2023, they’ve moved that solar controller screen over above the dinette where the thermostat is. So now they have that whole wall that they could put the ladder there.
So that’s a really cool solution and definitely worth knowing about. If you’re interested in more content about the difference between the 2021 and the 2023 or even the 2021 versus the 2022, please let me know in the comments because I could put together some more content highlighting the differences. That way, if you’re in the research stage and you’re looking between buying new or buying used, you can see what the differences are.
The next idea I thought was a really cool solution. And this is what we would have done in our trailer if we were still looking for a solution. The solution is to add rock climbing pegs to that really small wall in between the bathroom and the bunks.
There’s already a handle up top and all the way down that wall where the handle is, there’s a two by four, so you can secure something to that edge right there. So you can add a few rock climbing pegs. I think you would probably only need one, but two might look a little bit better. You could just add one or two little rock climbing pegs and that gives a couple extra spots for them to put their feet on as they’re climbing up.
Here are the rock climbing pegs we would have added:
So I think that would be a really cool solution and I think having one more little step would’ve been a really big help when our son was a bit younger.
Year 2 Issues
Okay, now let’s go over the new issues that came up in our second year of ownership.
Water Leak
So the first was a water leak. One of the PEX lines that’s near the hot water heater under the front bed started leaking. It was only leaking when the hot water was on. There was too much pressure built up in that hose between the hot water tank and the outside shower. It was just the way that the hose was situated. It built up pressure and caused a leak.
So this was actually a really easy fix. Once we had the right tools. We, of course, happened to be camping while this happened and we didn’t have any way to fix it. But it was our last day, so not a big deal. We came home and once we had the right tools, it was an easy fix.
We just replaced that PEX line with a new one and now we keep the tools to replace the PEX hoses in the trailer. So anytime we go camping, we have that stuff in case there’s another leak and we just need to replace a line. We can do that.
These are the items we now keep with us to fix the PEX lines:
- PEX Clamp Removal Tool
- PEX Pipe Cutter
- PEX Crimping Tool
- PEX Vinyl Tubing
- PEX Clamps Kit
- PEX Bend Support
I think it’s a good thing just to keep on hand because you never know when something like that is going to come up.
USB Port
The next issue that we had was one of the USB ports in the lower bunk broke. We think that this probably was caused from somebody kicking something that was plugged into it just from some roughhousing that isn’t normal use. That’s our guess anyways.
And all we did was get a replacement. We were able to get that same exact USB port, replace it, and it was a pretty easy fix.
But now just to be on the safe side, we make sure that nothing’s plugged into those USB outlets while we’re traveling.
Bathroom Fan
Another issue we had is our bathroom fan. The ceiling fan stopped working. You’d go to click the switch on the wall and it didn’t turn on. It just didn’t do anything.
It turns out what happened is the cables behind the switch on the wall had come out. They just wiggled loose. And that again, was a really easy fix.
We just had to get the cables from the wall and put them back where they go in the switch and then it worked fine, no problem.
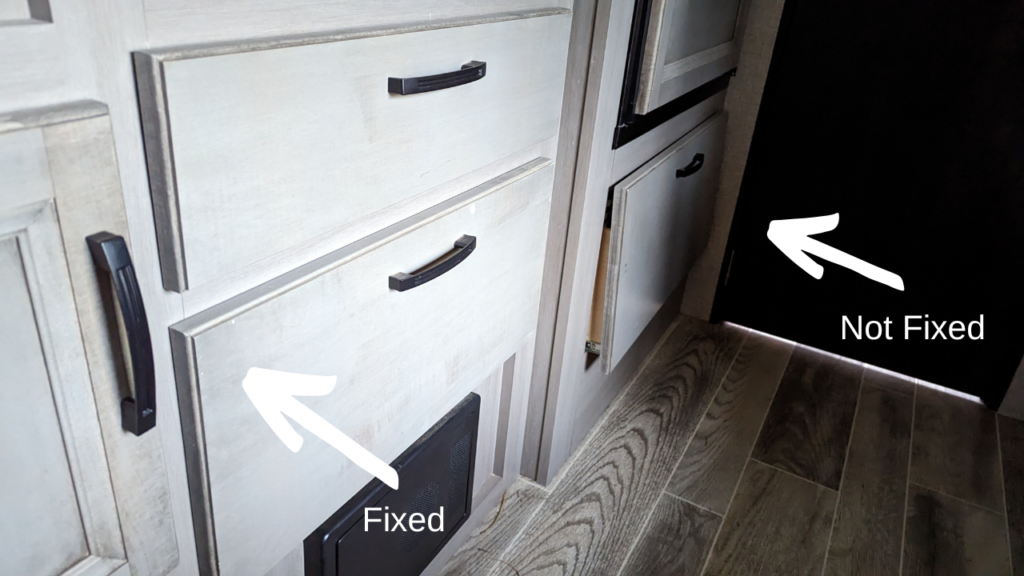
Trim / Molding
We’ve also had a few more molding issues. In the first year review we talked about the molding next to the door being loose. We also had some molding near the bunk bed come off and that was a pretty easy fix.
There’s just a little screw next to the dinette. We just unscrewed that slightly, popped the molding back in place, re-screwed the dinette to it, and that’s been fine now. So it was a super minor issue.
Dinette Cushions
Another issue is the backs of the benches on the dinette constantly fall forward. The little tiny circles of Velcro that they put on the back is not enough to hold them up. It worked at first and now it just has had too much wear on it and they don’t stick anymore.
So super easy fix. We’re just adding a big strip of Velcro back there so that there’s more for it to catch and that’s really all it needed.
Puck Light
Also, one of our lights above the dinette, partially broke. The little plastic casing on it (the part you see) with the button broke. So you couldn’t click the button anymore. But we just took off that piece and the physical button and the actual light all still function just fine. It’s just the nice looking cover on it with the button that broke.
Since we didn’t see an option to just replace that plastic piece that we needed, we would’ve had to swap out the whole light anyways, we decided we might as well do a little bit of an upgrade. So we got new puck lights that are really similar looking, but they can be a blue light and then the regular light is dimmable.
Here are the puck lights we upgraded to:

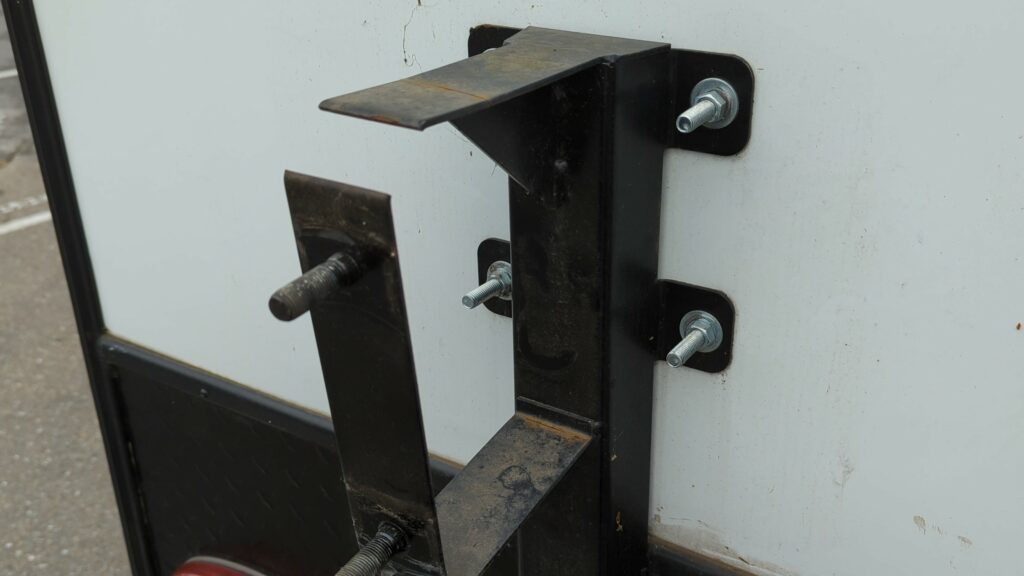
Spare Tire Carrier
And then another kind of big issue that we had is our spare tire carrier broke.
Now I know this is a recalled part, so of course we knew that there was a chance that this could happen and it was something that we would check because we knew that it was a weak point and something that needed to be replaced.
I did put our name on to get the recall part, literally one and a half years ago. So our name has been on this list at our dealership for a long time, and at first I would call the dealership monthly and they would just say the same thing over and over. It was always yes, you’re still on the list and we don’t have the parts yet. And I did that for probably six months.
And then I just sort of gave up. You know, we’re DIYers and we weren’t super eager to take the trailer into service anyways. So we were like, well, it hasn’t broke yet. Seems like it’s fine. Not that worried about it. So I just kind of ignored it and haven’t pestered the dealership probably as much as I should have.
Well, we were leaving for a camping trip and when we were walking around the trailer, we noticed that the tire was not hanging flat anymore. It was at an angle and we looked and the carrier had snapped.
So we decided let’s just get the tire off, we’ll put it in the back of the truck. We luckily had a lot of space during that trip, so we’ll just stick it in the back of the truck and then deal with this when we get home.
The next problem that we ran into is the tool that you use to get the lug nuts off of your tires is not the same as what you use to get it off of the spare tire carrier. So there’s the tool that came with the trailer and then we also had our own that we carry in case something happens to the tires and neither of those will work. It’s not the right size.
And also you have to have a very thin tool to work with the spare tire carrier and we intentionally don’t use a thin one because there’s a better chance that that is going to break. So we needed to get a completely separate tool to be able to get this off. We had to stop by an auto parts store with the trailer and luckily they had the part we needed and we were able to get that off.
So what we decided to do with the spare tire carrier was just fix it ourselves. My father-in-law has a welder and my husband and my father-in-law were able to just get a new chunk of metal to put in there to act as a big support. And then they welded all of the weak points.
There was not only the point that broke, but there was a couple other points that were close to breaking. So they cleaned all of those up and spray painted it and we put it back on. It only took them a couple hours.

So we’ll probably just stick with that. I don’t have a lot of faith that the dealership will ever get us that recall part. And now I feel like we’ve got a pretty good fix.
The big learning that we got from this is that we need to have a separate tool to get the tire off of the spare tire carrier than we do to get the tire off of the actual trailer.
Here are the two tools we now keep on hand for the tires:
Summary
So that’s it. Those were our year two issues. And like I said, we still absolutely love this trailer. Every time we go camping, everybody is still so excited to go, so excited to get to use the trailer again.
And you know, we have had a few issues here and there, but we do expect to have things like that come up from time to time. So for us , there hasn’t been anything so upsetting that it takes away from all of the joy that the trailer is bringing us.