We recently did a big solar upgrade on our Jay Feather Micro using lithium batteries and an inverter. We wanted to go over and explain exactly what we did.
- Where to Learn Details About Installing Solar
- Determining if Lithium Batteries and an Inverter are Right for You
- Why We Chose These Components
- Determining How Many Batteries to Add
- Storing Our Batteries Inside
- Solar Component Location Overview
- The Items We Used
- The Details on How We Upgraded Our Solar System
- Tips for Opening the Underbelly
- How our Batteries Charge
- Monitoring the System
- What Works with the Inverter
- Testing the System
Rogina Roaming is supported by its audience. When you purchase through links on our site, we may earn an affiliate commission at no extra cost to you.
So we’re going to talk about what we did, but not how we did it. We’re not going to go into a detailed how-to on exactly how to add solar to your system. Mostly because we just aren’t qualified to do so. We were lucky enough to have my father-in-law help with the project who happens to be an electrician.
Instead, we’ll show you what we did so hopefully you can get a better idea of how to run cables and where to place the components in your own trailer.
Where to Learn Details About Installing Solar
If you want detailed guides on exactly how to wire all of this stuff up, there are some videos that we used in our learning process.
Here are the videos that we found helpful to learn what to do with all of the different wiring and configuration for the solar upgrade:
- Explorist.Life – How to Install Solar in a Camper
- Explorist.Life – Full Electrical Install
- Explorist.Life – Camper Solar Setup
- Explorist.Life – Basic Electrical Wiring Tips and Tricks
- This playlist is filled with detailed how-to guides that help you determine how to choose the right equipment and shows exactly how to install everything from crimping cables to configuring the inverter.
- All About RVs – RV Solar Info
- Changing Lanes – Solar Install
- Changing Lanes – Inverter and Cerbo GX
- Irene Iron Travels – RV Inverter Install
- DIY Solar Power with Will Prowse – Victron Made Easy
- Ross Lukeman – Monitor and Control with Cerbo GX
Determining if Lithium Batteries and an Inverter are Right for You
So, this is a fun upgrade. This isn’t a must have upgrade.
We have another article where we review the Go Power! solar system that came with the trailer. And we also have an article explaining why we’re upgrading to lithium batteries.
If you aren’t sure if upgrading to lithium batteries and adding an inverter is the right route for you, I’d suggest checking out those articles so that you can get a better idea if this upgrade makes sense for you.
Why We Chose These Components
Determining which solar components we should add to our trailer was a long evolving process.
To start, all we really wanted were lithium batteries and a shunt to monitor exactly what’s going on with the batteries.
We decided that we also wanted to upgrade our solar controller to a MPPT controller instead of the PWM that we had with our Go Power system. The Go Power PWM controller would have worked with lithium. But, the MPPT controller is more efficient so we decided it was worth the upgrade.
And then to start we actually weren’t going to add an inverter. But, what we found out is that the converter that comes with the trailer can charge either AGM or lead-acid flooded batteries. It can not charge lithium batteries. So, we would have had to upgrade the charger on our converter to be able to charge our batteries with it.
What we decided to do instead was just jump right to the Victron MultiPlus inverter. The MultiPlus was the inverter that we were already looking at getting. And the Victron MultiPlus inverters are inverter chargers. So by using one of those we bypass the need to charge with our converter system that came with the trailer and instead we just use our inverter.
The reason why we went with the MultiPlus 3000 instead of the MultiPlus 2000 was primarily because of space. We found a hidden compartment underneath the bed. You access it through the pass-through. There’s a small wall with a light, switch, and outlet on it in the pass-through behind the entry door and behind that wall is space roughly 20 inches deep, 20 inches wide, and 20 inches high. There were only a few cables hanging in the area. We simply cleaned up the cables and re-mounted the light, switch, and outlet to a different spot in the storage area.
We found that the new spot we discovered is the perfect fit for the MultiPlus 3000. The MultiPlus 2000 is a different shape. It’s more of a skinny rectangle whereas the 3000 is a cube shape so it fits in the space that we had a lot nicer.
The trailer is actually pre-wired for an inverter. You can find that cable under the bed near the water heater. We didn’t actually end up using that. It would have been helpful if we got a smaller inverter. But with the lithium batteries we would have still needed to change out the converter to be able to charge the batteries if we had used that pre-wire cable. So instead, we just went directly to shore power. Which is how the Victron MultiPlus inverter charger is designed to be set up. So by doing that we just bypassed both the converter and the need to use the cable for the inverter pre-wire.
And then we were concerned about having a big hole in our wall where the Go Power controller was in our original system. We decided to add a Cerbo GX and a Cerbo GX Touch screen as well, mostly to fill in that space and also to have a really nice way to be able to view what’s going on with our solar system directly within the trailer.
And then for our solar panels, for now we’ve decided just to stick with the two 190 watt Go Power panels that we have from our original set up. So we have two 190 watt panels so we have 380 watts.
We do have space on our roof for a third panel. We have a roof rack up there and we could put a panel on top of the roof rack. That is an option that we might add a third panel if we find that we need it. We did also get a larger MPPT controller so that if we do want to add to our solar array we can do that without having to upgrade any of the other components.
Determining How Many Batteries to Add
So once we decided that we did want to move over to lithium and get an inverter, we then had to determine how many batteries we should get.
We originally had two 6 volt golf cart batteries. So even just two Battle Born batteries, which are lithium 100 amp hour batteries, would have been a big upgrade to our existing system. Because we originally had two 6 volt batteries wired in series and if we switched to 12 volt then we’d be wired in parallel and that’s already an upgrade. Plus, lithium batteries can be drained 100% whereas the flooded batteries can only be drained 50%.
So again, replacing two 6 volts with two 12 volts would have been great. But we decided that we really wanted to have three batteries. We wanted to have a larger battery bank available because we like to camp in the shade. So if we have extra battery capacity then we’re not relying on our solar panel to recharge the batteries. It’s not as important if we get back up to 100% because we have some extra battery capacity.
So we decided that we wanted to have three Battle Born 100 amp hour batteries. So that’s 300 amp hours of batteries which can be depleted 100% unlike the AGM or lead-acid batteries that can only be depleted 50%. So that would give us 300 usable amp hours in battery capacity.
Storing Our Batteries Inside
Okay, so we decided on the three batteries and we wanted to store them under the front bed. But we had to figure out how we were going to fit those.
The first step was we wanted to make that space easier to access. So we added a hinge to the access panel under the bed that houses the water heater. Now instead of unscrewing it each time we can just lift it up. We also added a little hole in the top so you can just stick your finger through, open it up, and it’s really easy to get to that spot now. And with the mattress on top it’s not going to wiggle around while you’re traveling.
Putting the batteries under the bed was important to us for a couple of reasons. We wanted them off of the tongue because we’d like to repurpose that area. We haven’t figured out a plan for that yet, but we do want to use that area to give a little bit more storage for sewer items. So we wanted them off of the tongue for that, but we also wanted to bring them inside because lithium batteries shouldn’t be charged when it’s too cold. So we wanted to make sure they were inside where it was a bit warmer and we didn’t need to worry about that.
The Battle Born batteries are available in two different sizes. You can get the Group 24 (the standard size) or you can get the GC2 (the taller, more upright size). We originally thought the GC2 would fit better in the space where we wanted to put them. But, what we realized was any of the batteries can be put in any direction and the Group 24 ones put in the upright position actually fit the best. They are a little skinnier so we could put three all next to each other as long as they were upright.
Before we dropped a ton of money on batteries, we decided to get an idea of exactly what type of batteries would fit best and how we would arrange them by making some cardboard placeholders. We just used some cardboard boxes and cut them up to be roughly the same size as the batteries.
And then we just played around with them in the spot we wanted to put them to make sure it seemed like they would fit. After that we used a tool called SketchUp to do a mock-up and just make sure everything would fit perfectly before we placed the order.
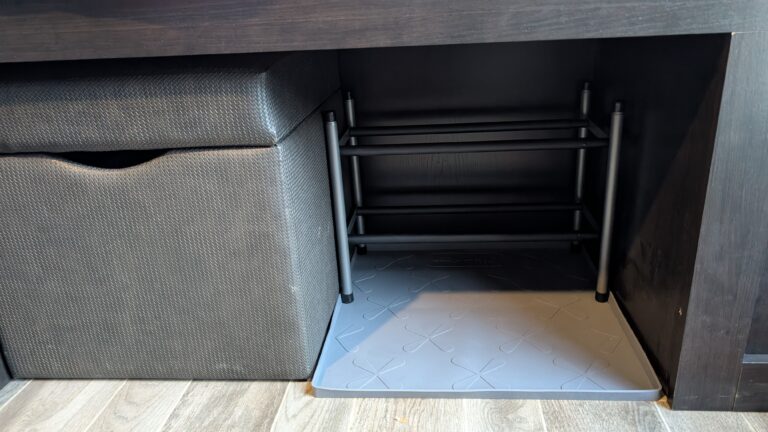
Now, to get three batteries to fit in that area we had to raise it up a little bit. There were some wood braces on the edges and we needed to put a new bottom in it that went above those braces on the edges so that the floor of the area just had a little bit more width. Now we did like the idea of raising it up, making a new bottom that was lifted up a little bit just because this is next to the water heater and that way if there is any kind of leaks or any water issues the water’s going to go underneath the batteries instead of the batteries sitting directly in a puddle of water.
And then, to secure the batteries we put two slits in the new bottom we created. And then we got a strap and put it in the slits. It came up, we put the batteries in it, and we can tighten all of the batteries to that new base.
And then we just have a board in between the battery area and water heater area mostly as a splash guard.
Solar Component Location Overview
Okay, now there’s a lot of different components involved in this set up. This is where the different components we used are located in the trailer.
Underneath the bed near the water heater we have three Battle Born batteries. In that same area we have the Victron BMV 712 shunt and battery monitor. The battery monitor is installed in that same area but it looks out to the pass-through.
In the pass-through we have a Victron Lynx Distributor, a battery disconnect, our fuse, and conduit that all of the cables run in.
And then in the other area we found under the bed (which is also accessible through the pass-through), that is where we have our MultiPlus inverter charger.
Underneath the dinette bench closest to the bunks is where we have the MPPT controller, the solar disconnect, and the Cerbo GX.
And then on the back wall between the bathroom and the bunks is where we have our Cerbo GX touch screen installed.
The Items We Used
Here is a full list of all of the different components that we used for our solar system.
- Primary Components
- Fuses and Circuit Breakers
- Cables
- 6/3 AWG Romex Cable
- 4/0 Gauge Black Cable
- 4/0 Gauge Red Cable
- 10 Gauge Black and Red Cable
- 6 AWG Black and Red Cable
- ½ inch Heat Shrink Tubing, Red
- ½ inch Heat Shrink Tubing, Black
- ¾ inch Heat Shrink Tubing, Red
- ¾ inch Heat Shrink Tubing, Black
- 4 AWG 5/16” Cable Lugs
- Crimp Terminal Connector Sleeves
- Victron VE Direct Cable (32 feet)
- Victron VE Direct Cable (3 feet)
- USB Extension Cable
- HDMI Extension Cable
- Tools
- Organization and Appearance
- Large Conduit (in pass-through)
- Small Conduit (below bunks)
- Black Molding Trim
The Details on How We Upgraded Our Solar System
We have a detailed walk-through that shows not only where we placed the different components, but also how we ran all the cables. We discuss how the original cables were ran and then what we did to run cables for our upgrade. We start from the roof down and explain the whole system.
The system is easiest to understand when looking at it. Jump to 12:06 in the video below to watch the detailed walkthrough. And if you prefer to keep reading just turn on the captions on the video so you can read the details while viewing the system.
Tips for Opening the Underbelly
To complete this solar upgrade you’ll want to drop the enclosed underbelly on the trailer to access the wires. Everything runs under the trailer from the kitchen sink to the water heater compartment and then all the way up to the ground at the front of the trailer.
When dropping the bottom you’ll need to remove the gas line near the front entry steps. There are just two screws and then it pops right out. It just makes it much easier to get underneath the sink area.
Putting the cover back on is pretty easy. It’s kind of hard to find the holes that the screws came out of but since they’re self tapping screws it’s pretty simple to just pop them up there and get it started with a new hole.
How our Batteries Charge
During this upgrade we disconnected the 7 pin. The lights and everything else on the trailer all still function totally normal with the 7 pin. The only difference is it’s not going to charge our batteries.
Lithium batteries can be thirsty and it can cause issues with the tow vehicle alternator. Since the 7 pin wires are small it should be fine. It probably wouldn’t be an issue, but it also just wouldn’t provide very much of a charge. So for us it didn’t seem like it was worth the risk.
You can get a DC to DC charger to charge your lithium batteries from the alternator on your tow vehicle but we just decided not to do that at this point. It’s something that we can add later if we want to.
Our tow vehicle is an etorque. It’s a Ram 1500 etorque and that’s a mild hybrid system so we don’t have a standard alternator. And we’re just not sure yet if the DC to DC charger works with the type of alternator that we have or not. We decided that it’s just not worth messing with the new truck yet. We’ll just charge it in other ways.
So our batteries can charge via shore power, so if we’re plugged in. Or they can charge via solar, so from our solar panels.
Charging them via solar is our primary method of charging up our batteries. If we’re going on a trip and we’re not at a full charge then we just hook it up to our house. We have a dogbone that lets us hook it up to a regular outlet. And we just charge it up that way. So that’s how we charge our batteries, either shore power or solar.
Monitoring the System
We have a couple of different ways we can monitor our solar system.
We have a BMV, the battery monitor that came with our shunt, which is in our pass-through. We have that as a backup option so we have an additional way to monitor our batteries.
We also have our inverter in an easy to access spot so we can turn it on and off and change it to different modes directly on the inverter.
But, we primarily use the Cerbo GX touch to monitor and control everything. It allows us to control the inverter and turn it on and off. It also lets us change the settings on the MPPT and on the BMV and it lets us monitor the flow of everything and see how much power we’re getting in and what level our batteries are at.
The BMV and the MPPT can both be controlled via Bluetooth on your phone as well. The inverter needs an adapter to be able to do that. So if you had a system like this, and you didn’t use the Cerbo GX, you’d want to get the Bluetooth adapter for the inverter and that way you can just monitor and change all of the settings on your phone using Bluetooth.
What Works with the Inverter
Now what works with the inverter? What can we use with this Victron MultiPlus 3000 inverter?
We can use our fridge. So, previously when we would travel, we would have propane on for our fridge. (Which isn’t the best idea.) But now we can have the propane shut off and we have our fridge on and using the inverter to be powered until we get to our campsite. And then when we park we turn the propane on and switch the fridge so it’s no longer using the inverter.
So the inverter lets us use our fridge on electricity. It also allows us to use our microwave and we can use any outlet in the trailer. I used a blow dryer and that worked fine. I’m not really sure why you would want to but you can also use the hot water heater on electric using the inverter.
We haven’t purchased a soft start for the air conditioning unit yet but if we add a soft start then we should also be able to power our air conditioning on the inverter.
So far we’ve used this system camping once. And it worked out really well. We were camped at the beach so we had pretty good sun. And our batteries were not below 90% the entire time. I did use the microwave, not much, but for about four minutes. And we used the inverter to power the fridge while we were driving there. Our normal usage with the trailer just really didn’t do anything to the batteries. Turning lights on, the water pump, none of that was a big draw at all. So we were really happy with that.
Testing the System
We actually have another trip planned in just about a month where we’ll be camping in the redwoods. So we’ll have lots of shade. It will be a challenge to recharge our batteries. But, it will be a great test to see how the trailer does with our 380 watts of solar on top and our battery bank of the three Battle Born 100 amp hour batteries.
And those were the tricky not ideal solar conditions that we really built this setup for.
So after that trip we’ll do a full review of how this system works when you’re not parked in ideal conditions for solar.
If you haven’t already done so, please subscribe to our YouTube channel to stay current on our journey.

Thank you so much for the detailed write up, after buying one you realize how hard it is to get specific information on wiring, how its routed etc. This cleared up so many questions I had in trying to figure out what and how to upgrade my new 2023 we just started using. Since we do boon docking sometimes and have a 12v only fridge its critical I get upgraded to lithium in case we’re in shade or bad weather.
No problem at all! I’m so glad it helped. Upgrading to lithium is definitely worth the hassle and expense for that peace of mind while boondocking.
Jennifer, My wife and I love your videos and find them very informative. I have watched them so often I would probably recognize you at a campground. I am looking to relocate our LiFePO4 battery to the compartment with the hot water heater. I know that too much heat is also not ideal for the battery. Have you ever measured how hot the temperature gets in that compartment?
I’m so glad you guys like the videos and have found them helpful! That is a great question. We have had our batteries there for years now and haven’t had any issues but I wanted to test it out a bit. I put a temperature sensor on top of the water heater close to our batteries and turned on the water heater. It heated the water up for 10 minutes and did not increase the temperature in that compartment at all. You can feel the heat outside the trailer. It seems to do a good job routing the heat outside and the inside is insulated enough there wasn’t an impact. I put together a short video with the info: https://youtube.com/shorts/c7_8cvlj1ho
Thanks for the hot water heater compartment temperature video!