Our trailer came with a 12-volt Furrion TV with an integrated sound bar. This TV is great because it can run off of the battery so you can watch it anytime. That lets you watch it while you dry camp. But it also lets you watch it while you’re at a rest stop or while you’re eating lunch on your travel day. And the TV sound system is also connected to the outdoor speakers. So this is both the TV and the sound system. We do like having this TV in our trailer and we find we use the TV and the sound system pretty often. Getting a few of these features to work smoothly though, was not very intuitive. So we thought we’d go through and give a few tips to make some of these common features that we enjoy using a little bit less confusing.
Rogina Roaming is supported by its audience. When you purchase through links on our site, we may earn an affiliate commission at no extra cost to you.
Demystifying the Furrion TV
What I think is the most confusing part of this tv, is that the area that looks like the speaker, also has buttons. It isn’t clear at first glance, but you can actually click the icons that look to be only lights. Between that, and the fact that the remote that comes with it is an all-in-one and it has several buttons that don’t do anything with this TV it makes it not very intuitive to use.
Configuring Bluetooth
One feature that we think is the most confusing but we use it every time we camp, is playing music outside via Bluetooth. So this was something we really wanted to walk through on how to do that to help anyone else that might be confused about this.
To get the Bluetooth paired with your phone or device you want to use:
- Hold the BT button on the bottom of the TV for six seconds to make the TV discoverable
- If you still don’t see it on your phone or device you’re trying to connect to, then just turn the TV off and then on again, and then try it again. Hold the BT button down for six seconds again.
- Then you should see the Furrion Sense 32 inch TV
- Follow the steps on your device to get connected
Using the Outside Speakers
Now that the TV is connected via Bluetooth to the device that you want to play music with, you want to turn on zone 2 for the outside speakers to work. Now, this part I think is not intuitive at all. For zone 2 to work, you click the light up zone 2 button on the TV. This is one of those buttons that is in an area that looks like it’s a speaker. It’s not very clear that it’s a button but that is what you need to push to get zone 2 to work.
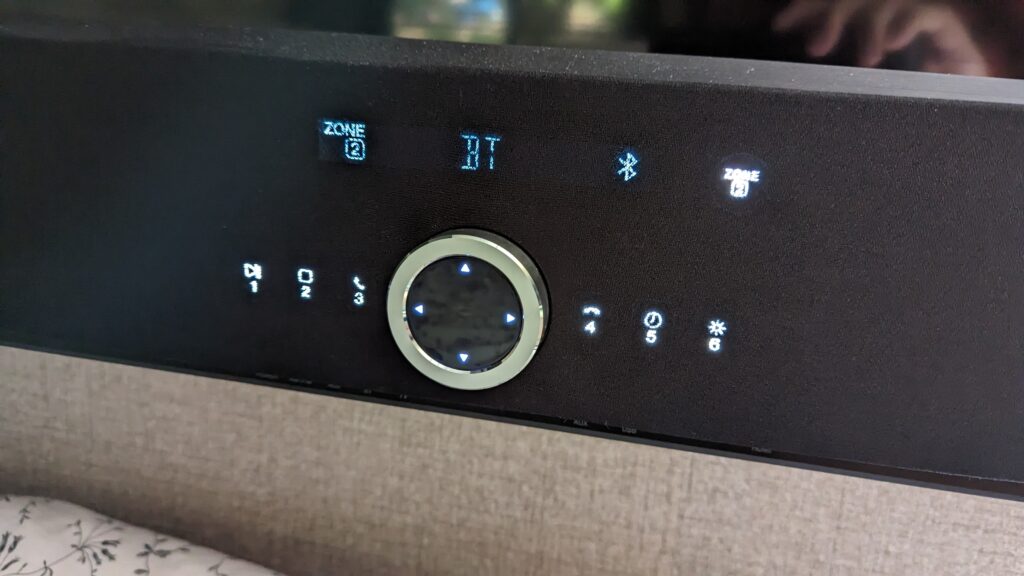
When you click that, it will turn both zones on because by default zone 1 was already on and then when you click zone 2, it turns that on as well. If you want to turn a zone off, click it and hold it for six seconds. You’ll see zone 1 on the left side and zone 2, on the right side.
The volumes are controlled separately, so click the zone and then adjust the volume. I like to turn the volume up louder than I think I actually need it and then turn it down on my phone. It’s easier for me to adjust it up and down on my phone. For some reason, I find that when I adjust the volume on the zone sometimes that causes it to lose the Bluetooth connection and then I have to reconnect it by holding down the BT button again. So now I just turn the volume up louder on the TV and then I decrease it on the device that I’m playing it through. Just so I don’t have to mess with the TV once it’s all working.
Anytime you turn the TV on, it will only turn on zone 1 by default. So if you’re listening to music outside and then you go inside and you’re worried you might be playing music outside, just turn the TV off and then turn it back on again and you’ll be good.
Setting the Clock
The next important feature that we like about the TV, that was not very intuitive was setting the clock. Since the TV is 12-volt and runs off of the battery, you could set the clock on it and it will stay set because it’s not relying on whether or not the trailer is plugged into shore power.
To set the clock:
- Turn the TV on
- On the part that looks like a speaker, there are buttons that light up, you’ll want to hold down the number five button which has an icon of a clock
- When you hold that down, you’ll see the time will start blinking.
- You can use the dial on the TV to adjust the time
- To move between minutes and hours you can click the arrows on that dial, but they are very difficult to click. I have gotten this to work multiple times. But for some reason, it is not very consistent. What I would recommend using are the arrows on the remote control. So on the remote there’s a circle area with arrows on it. Just use those left and right arrows to go back and forth between hours and minutes. And then use the dial on the TV itself to adjust the numbers.
- When you’re finished, just wait and it will set the time
- You can’t see the time while the TV is on, but once it’s off, you can see the time on the sound bar.
Retro Video Games
Another item I wanted to discuss in regards to the TV is a few people have noticed in some of our videos that we’ll be playing retro video games. And I’ve been asked how you can get the retro video games on your TV. I’m sorry to say, but that was actually a gift from someone far smarter than myself. How that works is he built a raspberry pi. It’s a tiny computer and he used a software called retropie. This is something that you can look into if you’re technically inclined, but I did not build this machine and so it’s not something that I can advise. But it is a lot of fun and it can be plugged in via USB so it gets powered off of the TV so it works completely off grid just like the TV.
Off-Grid DVD Player
Now, on a similar note, I also wanted to talk about how you can watch DVDs with your TV and not just watch DVDs but watch them off grid. This TV is 12-volt, it works off of the battery. You don’t need to be plugged in to use it. But how can you also watch DVDs while not being plugged in? The answer is really simple. It’s just like how we run our video game system, our raspberry pi. We have a DVD player that is powered by USB and on the side of the TV is a USB port. So, you can take your DVD player and plug in the HDMI and then also plug in the USB for the power source. This is a super simple system. And it works awesome. Because now you can watch movies off of your battery as well. You don’t need to add in any extra USB plugs or extra power outlet to do it. You don’t need to have an inverter, you don’t need to be plugged in. It’s just powered completely off of the TV.
Cargo Nets
And then the last thing that I did want to mention because it really makes it so much nicer to access everything for the TV is we’ve installed cargo nets. We have one hidden behind the TV and then we put a second one right next to it. We like to stash our remotes in it, and then the cargo net that’s behind the TV works great to put either the DVD player or the raspberry pi because the cables go right up to the TV and they’re out of sight. Our trailer actually has a little shelf up above the TV. I know not all of them do but that’s where we used to keep our DVD player and then we realized that adding these cargo nets is even easier. It’s easier to access the remotes while we’re in bed, and it’s nicer cable management.
Conclusion
So hopefully this helped. This clearly is not everything that you can do with your Furrion 12-volt TV. But these are the things that we use it for most often. And so we wanted to outline this and make it clear for anybody else that was interested in using it the same way.