Cooking s’mores on the Blackstone griddle is a great option. Both cooking and clean-up are super easy and they taste great. The first time we tried it we were shocked how well it worked. Here’s how to cook s’mores on the Blackstone.
Why Would You Use the Blackstone for S’mores?
Burn Bans
The reason why we tried cooking s’mores on our Blackstone was because of a burn ban. In California it’s starting to be more common for campgrounds to have a burn ban during high fire season. When there’s a burn ban in place you can’t burn a wood fire. You can still use propane.
We do have a propane campfire we bring in those cases and you can roast marshmallows over them. We choose not to. We have kids and we know there’s a good chance one of them would drop a marshmallow in the fire pit. Although it wouldn’t be the end of the world, we’d rather not deal with cleaning up gooey marshmallow as we’re trying to put the campfire away.
Cook in Bulk
Another reason to use the Blackstone for s’mores is to cook them in bulk. Although the idea of s’mores in bulk might sound silly, it can be pretty useful. When everyone is at your campsite, you want to be hospitable. So, you end up cooking for a much larger crowd than you came to camp with.
If you cook s’mores on the Blackstone you can make enough for everyone. And they can all be ready at the same time. So, you cook them all and then you actually get to sit down and enjoy them around the campfire together.
Cooking S’mores on the Blackstone
Step 1: Heat the Blackstone on High
Start by heating up the Blackstone. Put it on high and let it heat up. This is an important step. If the griddle is hot enough the marshmallows start to toast immediately. This makes clean-up even easier because there is almost no sticky residue.
Step 2: Prepare the Graham Crackers
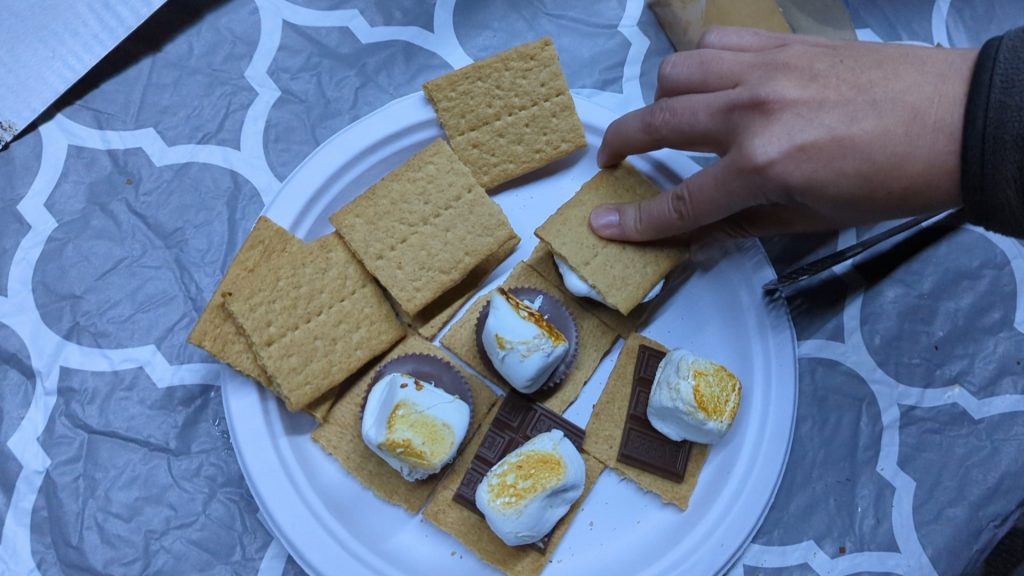
While the griddle is warming up prep everything other than the marshmallows. Get the graham crackers and chocolate all ready to be sandwiched. We like to prep some with standard Hershey’s chocolate and some with Reese’s peanut butter cups.
Step 3: Put the Marshmallows on Heated Blackstone
So, once the Blackstone is hot add the marshmallows. Keep it on high. As mentioned in the first step, this will help reduce the stickiness left on the griddle. It will cook fine even on a lower temperature, it just is stickier.
Step 4: Roll the Marshmallows
Once the marshmallows are on the griddle start rolling them around. Roll them continuously to brown all of the edges. It normally takes about 2 minutes for them to get cooked how we like them. Cook them as little or long as it takes for the marshmallows to cook to your liking.
Step 5: Place Marshmallows on Prepped Graham Cracker
Once the marshmallows look good, put them on the prepped graham cracker and chocolate and top with another graham cracker. Now, they’re ready to eat! Take a bite and enjoy.
How to Clean Marshmallow off the Blackstone
Whether your marshmallows made a sticky mess or not, clean-up is easy. While the griddle is still hot just squirt it with some water. The water will start to boil off any food. Scrape the food residue towards the grease trap. Just repeat this process until it looks clean. At the very end squirt a little bit of the oil you use to season your griddle (I use grapeseed oil) instead of the water. Just scrape it off the same way to re-season the griddle.
S’mores on the Blackstone Recipe
Ingredients
- Marshmallows
- Hershey’s Chocolate and/or Reese’s Peanut Butter Cups
- Graham Crackers
Instructions
- Heat the Blackstone on high.
- Prepare the graham crackers and chocolate.
- Put the marshmallows on the heated Blackstone.
- Roll the marshmallows until they are brown on all sides (about 2 minutes).
- Put the cooked marshmallows on the graham crackers and chocolate you prepared then top with another graham cracker.