Since we bought our trailer, we’ve pretty much been using the shower as a closet. We decided it’s about time that we make it a more functional closet. So we decided to upgrade from a few command hooks to organizers and a hanging system to get the most out of the space.
Rogina Roaming is supported by its audience. When you purchase through links on our site, we may earn an affiliate commission at no extra cost to you.
Why We Want to Use the Shower as a Closet
Now this won’t work for everybody, this works for us because we don’t use our shower. We’re normally going camping for only a weekend and when we want to shower, we just use the shower at camp. So we never find ourselves using the shower in our trailer. For the last couple of years, our shower has basically been a storage area.
Our Original Closet System
So the current system that we’ve been using is we have some command hooks that are all along the back of the shower and then we hang all of our jackets and sweatshirts there. We normally have umbrellas and life vests hanging up there as well. And then in the bottom on the tub we put a portable solar panel and sometimes we’ll have a guitar sitting there. So basically it’s just the area where we stash everything. But, we really wanted to make this a more functional area.
Goals for the New Closet System
So we wanted to be able to store all of the things that we normally have there, like jackets and umbrellas, life vests, our solar panel and a guitar. But in addition to that, we also wanted to be able to put the kids’ clothes in there. Instead of backpacks in the bed, we wanted to be able to put the kid’s clothes in our closet, our shower closet. We were also hoping that we’d be able to put some shoes in there. And we did want to make sure that we could still hang wet items up in the shower because it’s nice to be able to hang up wet towels or when those life vests get wet to have a nice spot that they could drip dry in the tub. And on top of all of that, we wanted to be able to store all that stuff in there, but we also didn’t want to commit to it.
We wanted it to be able to all be able to come out of there in case we decide we want to use that shower. We don’t want it stuck in there. We want to be able to take it out while we’re on a trip and be able to use the shower if we need to.
Converting Our Shower into a Closet
So here is the plan that we came up with. First, we left all of the command hooks in there. They didn’t interfere with what we wanted to do and we figured they could still be useful to hang some stuff on as long as it’s pretty flat. So the umbrellas can stay on the hooks in the back because they don’t interfere with anything in front of it.
For the main support in our new system, we knew that we wanted to use tension rods. We wanted to put in two tension rods so we basically have two different hanging shelf areas. So, we wanted to put tension rods in the tub and we could have just put the tension rods in the shower as is but we wanted to add as much support as possible just because the trailer’s going to be bumping down the road. We don’t plan to have a bunch of weight on it while it’s going down the road. But still, we wanted to use the existing corner shelves in the shower to add a little bit more support to the tension rods. But because of where we wanted the tension rods, it was right at the end of where those shelves were. So it wouldn’t end up being very much support for those bars. What we did was we got small square supports that are designed for a tension rod to go into. They stick onto the wall and we stuck them so they’re half on the shelf and half not, and then we just put the tension rod so it’s resting on those.
So the tension rods are resting on those braces that are stuck to the wall, which are halfway on the shelves. The system’s still pretty new, but we’ve gone on three trips so far and these things aren’t wiggling. They’re staying in place, so far it’s holding really well.
Now at the heart of the system, one of the main goals that we wanted to accomplish with this is we wanted a better way for the kids to be able to get to their clothes. The system that we were doing is they each had a backpack and we’d hang the backpack in their bunk beds and they’d use that for everything. The problem with it is not only was it difficult for them to dig through the backpack and find what they were looking for, but with their backpack hanging at the foot of their bed, they would kick the backpack out of bed. It would fall on the dog. So we stopped letting them sleep with the backpacks in their bed, but then they’re always getting moved around the trailer when they’re not in the bed. So they were always getting moved around and it didn’t seem like the best solution.
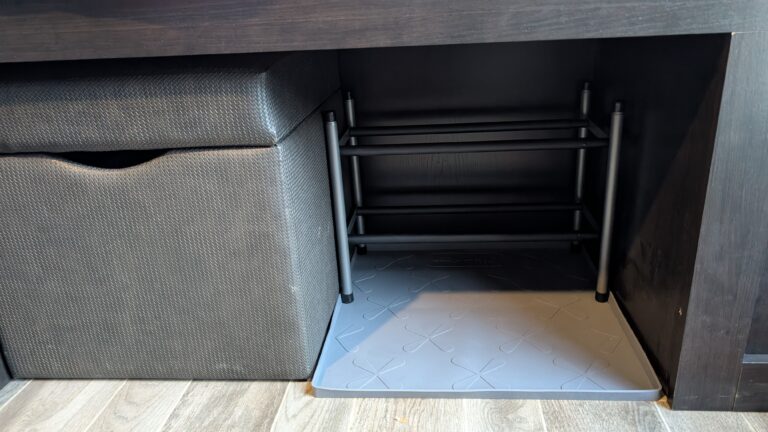
So what we did in our new closet system is the kids both got collapsing organizers to put their clothes in. So when they pack, they pack in these organizers and they can snap shut. So you could cinch ’em up, click ’em shut, and the clothes aren’t going to come out while traveling. But then as soon as we get to our destination, we hang them up on the shower curtain rod (the new tension rods that we have in our shower closet) and we unhook it and they have all of their clothes right there.
Our original plan is we had both of the kids clothing organizers on the top, but one of the nice things about this closet is it’s super easy to move things around. So what we found as we’re using it is it works well for our eight year old to have his clothes up top, but then for our four year old, we like them at the bottom because she can actually get into it herself, get herself dressed, and it’s easier for them. So it’s easier for us. And that original hook that they had on their bed, it’s still useful. Right now they seem to use it mostly to hang their hats on.
So back to how we organize our new closet. We have the two clothes organizers for the kids, and then we also have their life vests that we like to keep in the trailer all the time. And we snap those right onto the tension rod. And then on the bottom tension rod, we like to put a shoe organizer and then we also have a bunch of loose shower curtain hooks and we use those to hook on all of our jackets, sweatshirts and towels. They basically work like hangers.
Now for the shoe organizer, we actually have two different ones. The first one we got took up about half of the width on our bottom shelf and it worked really well. There was no issue with it other than the fact that I didn’t feel like we had quite enough space for jackets. Now it did work and it was enough space until I stuffed a guitar in the side and then that just seemed like a little much. So when we went to a thinner shoe organizer, we were still able to fit the shoes that we needed and we had more jacket space and I could still fit a guitar on the side without any issues.
The original shoe organizer was just too big for us. We had an entire row that was empty. We had nothing to do with that. So this smaller organizer has pockets on the sides as well as the front area. On one side I have the kids boots, and then the other side I have all of our sandals, which are the shoes that I keep in the trailer. And then there’s still four pockets in the front that we can all use to put our shoes in. So that’s worked out really well and gives us a lot more space in there.
What We Used
Here are all of the items that we used to convert our travel trailer shower into a closet:
- Tension Rod
- Adhesive Tension Rod Holders
- Collapsible Hanging Closet Organizer
- Shower Curtain Hooks / Hangers
- Shoe Organizer (Small / Preferred Version)
- Shoe Organizer (Large Version)
- Large Water-Resistant Command Hooks
Closet Adjustments
A nice feature of this closet is all of this stuff can be moved around. So we started off by having the two clothes organizers up top and then we shifted it. So one was up top, one was at bottom, and then instead of all of the jackets and everything at the bottom next to the shoes, we started moving the jackets up top.
And then that let us do things like take the life vests when they’re wet and take the towels when they’re wet and put those next to the shoes and still have a space to drip dry wet items right there in the tub. So it’s worked out really well for us and it’s nice that we can mix and match and make different arrangements for what we bring in the fall versus what we bring in the summer.
And then in this new closet, we also on the bottom, we can just lay our portable solar panel that we used to keep in the tub with the old system. We can still put that behind the shoe organizer, behind the jackets. We don’t use it very often, so it’s not a big deal that it’s not super easy to get to, but we still have it back there. And then on the side, we can still fit the guitar, so we can still fit all of the things that we had before. Plus we have the clothes, plus we have shoes and everything’s just easier to get to.
Travel Mode for the Closet
So when we travel, we normally have the tension rods empty other than the shower curtain hooks. I don’t normally have anything hanging on them, but the hooks themselves, I just leave on there. They don’t seem to matter. But what I do is I close up the kids’ clothes organizers, I snap those shut, take them off the hooks and just set them in the bottom of the tub. And then the shoes, I normally just lay them down on the bottom of the tub, just same thing as the clothes organizers to take them off and lay them down. My big concern is I don’t want anything smacking into the faucet in the tub while we’re driving and messing with those knobs. I don’t want anything to get turned on. Even with the water pump off, I don’t want to mess with anything there. So I make sure that everything’s laying flat and below that faucet.
For the items like jackets and that solar panel and the guitar, that kind of stuff, I throw them on our front bed. I find that I can put stuff on the bed and it doesn’t move while we travel. So I normally throw it on the bed and then when we get to camp, put it back into the tub and just rearrange the closet. The whole thing takes only a couple of minutes to put together.
Conclusion
The kids absolutely love this new setup. It really makes it easier on all of us. And if we still want to use the shower, we still can. It would only take a couple of minutes to pull everything off and just stick it on one of the beds, the front bed or the bunk beds temporarily while you’re taking the shower and then just put it back in. There’s nothing permanent about the system.